TL;DR
Every request through Cloudflare One passes through four layers in a fixed order: Client → Identity → Policy → Resource.
- Layer 1 (Client) produces signals about device, browser, posture, and network context.
- Layer 2 (Identity) answers “who are you” — user, group, role, MFA method, lifecycle state.
- Layer 3 (Policy) evaluates signals from the two layers above and returns one of five outcomes: allow, block, allow-with-conditions, step-up MFA, isolate (RBI).
- Layer 4 (Resource) is the destination — a private app behind a Tunnel, a SaaS app, the Internet, or a rendered browser (RBI).
The thesis:
When configuring a Cloudflare One feature or debugging an incident, the first question to ask is: which layer? The answer points directly at the right dashboard, the right log, the right owner, and the right fix.
This is Part 3 of the Cloudflare One Handbook — the mental model that will show up in every subsequent post.
Who this is for
- Security engineers and platform engineers about to configure Access, Gateway, Tunnel, or WARP.
- IT leads who need a shared framework for discussions with vendors, consultants, and internal teams.
- Anyone who has read Parts 1–2 but still doesn’t know where to start when looking at the Cloudflare Zero Trust dashboard.
Recommended prior reading:
- Part 1 — What is Cloudflare One (introduces the four-layer model at an overview level)
- Part 2 — SASE, SSE, Zero Trust, ZTNA (terminology)
After this post, you will have:
- A catalogue of concrete signals produced at each layer — not abstract concepts, but real field names.
- An understanding of the five possible policy outcomes.
- A “symptom → layer → check here” table for fast troubleshooting.
- Design principles for policies that combine signals across layers.
- A framework for deciding who owns what layer at scale.
What this post does not cover
This post does not walk through specific product configuration (Access setup, Gateway policy syntax, Tunnel config). That starts in Part 4.
This is also not a Vietnamese-language rendition of NIST SP 800-207. NIST uses a different abstraction (PE, PA, PEP) — useful in compliance documents, less convenient for hands-on configuration in a Cloudflare dashboard. The four-layer model here is simpler and maps directly onto how Cloudflare organises its UI and API.
Why a mental model is needed
The Cloudflare Zero Trust dashboard has more than thirty menu items. Approaching it with “try everything” or “install this first because the name sounds good” produces predictable problems:
- Enabling WARP before identity is clean — later policies have to reference IPs instead of groups.
- Creating an Access application before device posture is enabled — policies cannot verify the device.
- Writing Gateway HTTP policy before the identity provider is wired up — rules can only filter by URL, not user group.
- Debugging a “user can’t reach the app” incident without knowing which log to consult — ricocheting between WARP logs, IdP logs, Access audit, Tunnel logs, origin logs.
The four-layer model solves both problems:
- Roll out in order — build from the bottom up: clean identity first, policy later.
- Debug by layer — each symptom maps to a layer, which maps to a dashboard.
The four layers at a glance
Here is the same model from Part 1 (this is the anchor of the series — expect to see it again):
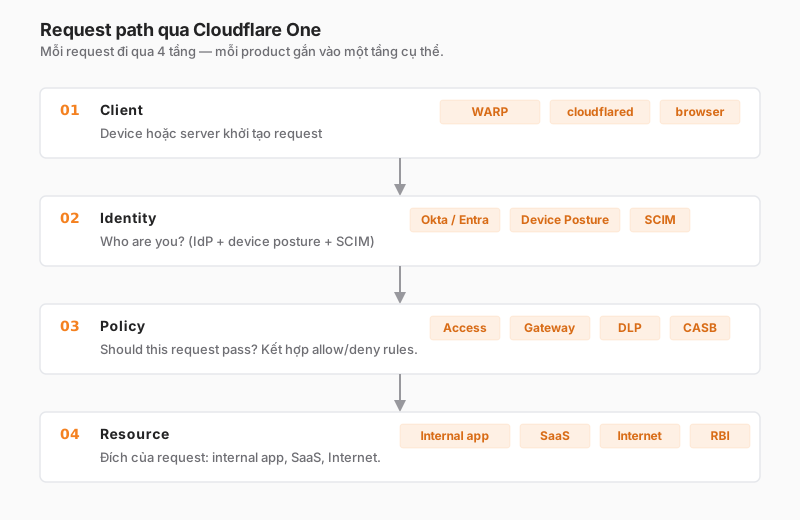
Each layer has three important attributes:
| Attribute | Meaning |
|---|---|
| Signals | Data produced by this layer and forwarded upstream |
| Decision | What decision (if any) is made here |
| Owner | Which team is responsible for configuring and operating this layer |
These differ meaningfully across layers — which is why Layer 2 does not overlap with Layer 3, and why the owner of Layer 4 rarely owns Layer 2.
Layer 1 — Client
Signals produced: everything about the device, browser, and connection state at the time of the request.
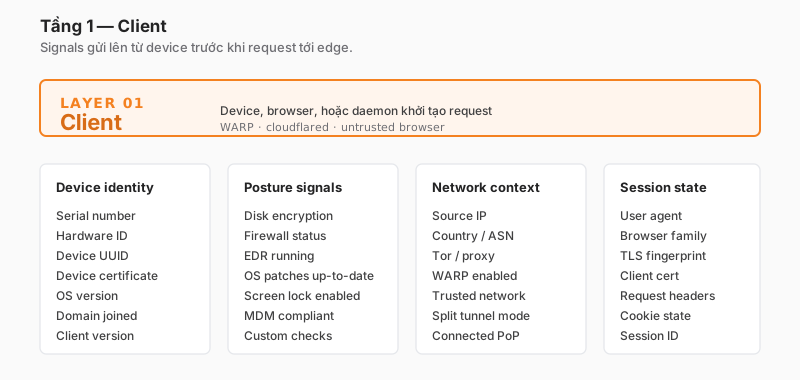
Notable signals
- Device identity: serial number, UUID, OS version, domain-joined status, client certificate. WARP sends these once the device is enrolled;
cloudflaredsends them when the connector starts. - Posture signals: disk encryption, firewall, EDR (CrowdStrike/SentinelOne/Defender), OS patches, screen lock, MDM compliance. This is the differentiator between ZTNA and VPN — VPNs do not ask these questions.
- Network context: source IP, country, ASN, WARP enabled, split-tunnel state. Used for rules like “allow only from managed networks” or “block traffic from high-risk countries”.
- Session state: user-agent, TLS fingerprint (JA3/JA4), client certificate, cookies. Relevant for anti-bot and API-abuse detection.
Cloudflare products at this layer
- WARP client (Cloudflare One Client) — the agent on laptops and phones. Collects posture and routes traffic to the edge.
- cloudflared — the daemon for server-side tunnels. Identifies itself with a tunnel token.
- Browser — when a user reaches
yourapp.example.comfrom a plain browser without WARP, Access still works, but signals are limited (no posture).
What decision happens here?
None. Layer 1 only emits signals. Policy enforcement lives entirely in Layer 3. This matters: do not expect the WARP client to “block” anything — it only collects and forwards. Enforcement (e.g. “block if disk is not encrypted”) must be expressed as a Gateway or Access policy (Layer 3).
Owner
Usually the IT / Endpoint team — they manage devices, deploy MDM, and set posture baselines. Not a pure security team, not a network team.
When Layer 1 becomes the bottleneck
- No managed devices — e.g. contractors on personal laptops. No posture → Access policy can’t verify the device → fall back to device certificates or step-up MFA.
- Partial WARP rollout — traffic outside WARP has no Layer-1 signals. Gateway policies cannot filter it.
- BYOD scenarios — browser-only access, no client. Session signals exist; device signals do not.
Layer 2 — Identity
Signals produced: everything about the user, delivered from the IdP through OIDC/SAML/SCIM.
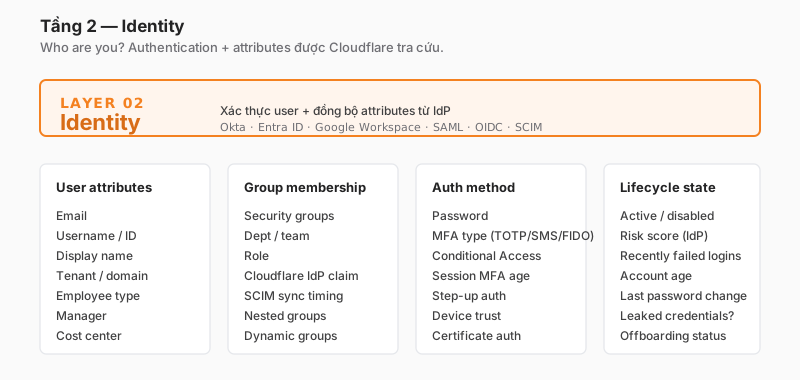
Notable signals
- User attributes: email, username, employee type, manager, cost centre. Claims from the IdP (Okta/Entra/Google). Policies can anchor on any claim Cloudflare receives.
- Group membership: security groups, departments, roles. The primary anchor for about 80% of policies. Group quality determines policy quality.
- Auth method: password, MFA type (TOTP/SMS/FIDO2), Conditional Access result, session MFA age. A policy can require “FIDO2 within the last 24 hours” for a sensitive app.
- Lifecycle state: active/disabled, IdP risk score (Entra ID returns one), recent failed logins, offboarding status. SCIM sync keeps this close to real-time (< 1 minute) when configured correctly.
Cloudflare products at this layer
- IdP integration — the Cloudflare Access connector for Okta, Entra ID, Google Workspace, generic SAML, generic OIDC, GitHub, AD, one-time PIN.
- SCIM provisioning — keeps group membership in sync when it changes in the IdP.
- Device posture correlation — not technically a Layer-2 signal, but Cloudflare Access lets you combine it with identity in the same rule.
What decision happens here?
Authentication happens here — the IdP verifies the password and MFA and returns an assertion to Cloudflare. Authorisation lives in Layer 3. The distinction matters:
- Layer 2: “Are you
alice@example.com?” → the IdP answers. - Layer 3: “Can Alice reach
gitlab.internal?” → the Access policy answers.
Owner
Usually the IAM team or Identity engineering team. Not the general security team. In smaller organisations, this may be the IT manager wearing two hats.
When Layer 2 becomes the bottleneck
- Dirty groups — the
Engineeringgroup has 200 members, 30 of whom no longer work in engineering. Policies built on top fail open. - SCIM lag — a user is deprovisioned in the IdP at 9am but not synced to Cloudflare until noon. The old token is valid for those three hours. Part 7 covers this.
- Wrong claim mapping — the IdP sends
department, the Cloudflare rule expectsdept. The rule looks correct but matches nobody.
Layer 3 — Policy
This is the brain of Cloudflare One. Signals from Layers 1 and 2 flow in, rules evaluate, and a decision is returned.
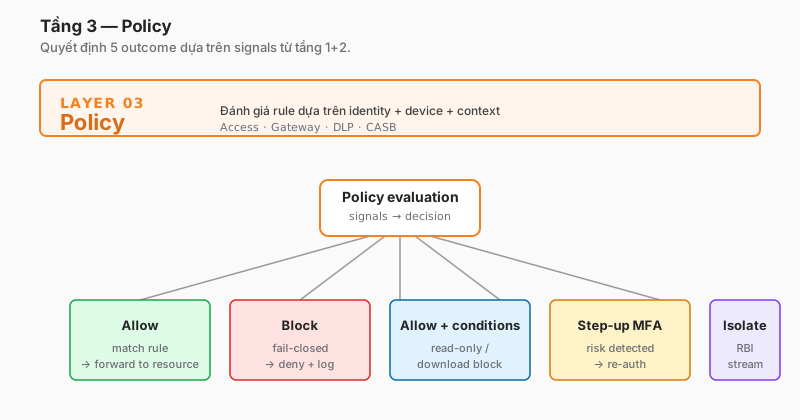
Five possible outcomes
Most teams assume policy has two outcomes (allow/block). Cloudflare One has five — and picking the right one for the right risk profile makes policies far more practical:
| Outcome | When to use | Example |
|---|---|---|
| Allow | Full match, fully trusted path | Employee + managed device + FIDO → Jira |
| Block | Fail-closed — conditions not met, or explicit deny | User without MFA → deny on a sensitive Access app |
| Allow with conditions | Let the user in, but restrict behaviour | SaaS read-only, no download, no paste |
| Step-up MFA | Medium risk — re-authenticate with a stronger method | Access to a production database → prompt for FIDO even after password+TOTP login |
| Isolate (RBI) | Allow, but through a remote browser | Contractor visits the internal admin panel — browser isolated, no local session |
Cloudflare products at this layer
- Cloudflare Access — policy for private applications. Create an Access application and define rules combining identity + posture + network context.
- Cloudflare Gateway — DNS filtering, network firewall, HTTP inspection policy for outbound traffic to the Internet or SaaS.
- DLP — content-based policy, inspects request bodies and responses.
- CASB — policy for SaaS APIs (misconfiguration scanning, exfiltration detection).
What decision happens here?
All authorisation lives here. This is where security teams spend most of their effort.
Easy to miss: order matters. Cloudflare Gateway and Access evaluate rules in order, first match wins. A mis-ordered ruleset (broad allow before narrow block) silently neutralises the narrow rule.
Owner
The security team — they own the policy logic. But the policies depend on quality upstream: groups from Layer 2, posture from Layer 1. When security writes policy on top of dirty groups from the IAM team, the failure shows up at Layer 3 but the root cause is at Layer 2. This is why ownership has to be explicit — “security owns everything” does not work.
When Layer 3 becomes the bottleneck
- Policy sprawl — 400 Access applications, 200 Gateway rules, no one knows which affects which. Audit becomes very hard.
- Rule-order conflicts — Allow “Engineering can reach everything” above, Block “no one may reach the admin panel” below → Engineering still reaches the admin panel.
- Policy drift — dashboard clicks instead of IaC. Changes are unlogged and rollback is hard. Part 4 covers policy-as-code for Access.
Layer 4 — Resource
The destination. Once the policy decision is Allow, Cloudflare forwards or proxies to the resource.
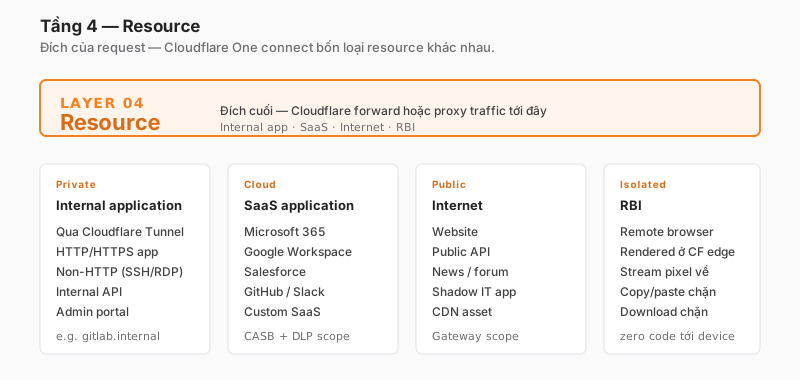
Four resource types
| Type | Cloudflare product | Access pattern |
|---|---|---|
| Private app | Cloudflare Tunnel | Outbound-only from infra, no public IP required |
| SaaS app | CASB, DLP | Direct to SaaS, with traffic routed through Gateway + policy |
| Internet | Gateway (SWG) | Traffic through the Cloudflare edge with inspection |
| Isolated browser | Browser Isolation (RBI) | Remote render, pixel stream, no code running locally |
Cloudflare products at this layer
- Cloudflare Tunnel (
cloudflared) — outbound-only, brings private apps into scope for the Cloudflare edge. - WARP connector / Magic WAN — brings entire network segments into scope (rather than per-app).
- Browser Isolation — renders the browser at the edge, streams pixels back to the user.
- Gateway egress — proxies traffic to the Internet or SaaS.
What decision happens here?
No policy decisions at Layer 4. There are however important design decisions:
- Does this private app move behind Cloudflare Tunnel, or stay on the VPN?
- Does Internet traffic get HTTPS-inspected? Privacy vs. DLP trade-off.
- Who gets RBI, and for which destinations? Cost trade-off.
Owner
- Private app → the application team owns the origin; the platform team owns the tunnel connector.
- SaaS → the IT/admin team owns the tenant.
- Internet → shared between the security team (policy) and the network team (egress path).
- RBI → the security team decides policy, but the UX impact lands on everyone.
When Layer 4 becomes the bottleneck
- Flaky tunnels — connectors disconnect or replicas fail health checks. The policy passes, the app returns 502.
- Origin failure — Cloudflare forwards the request cleanly, but the backend is broken. Logs in Cloudflare look fine; investigation moves into the application log.
- SaaS tenant misconfiguration — CASB detects a public file, but the owner doesn’t know who made it public.
Design principles — combining signals across layers
When writing policy, combine signals from multiple layers. Common patterns:
Pattern 1 — Employee + managed device → internal app
# Access application: gitlab.internal
policy:
  - include:
      emails_ending_in: ["@example.com"]           # Layer 2
      groups: ["Engineering", "DevOps"]             # Layer 2
  - require:
      device_posture:
        - disk_encrypted                            # Layer 1
        - firewall_enabled                          # Layer 1
        - os_version: ">= macOS 14 | Windows 11"   # Layer 1
  - exclude:
      country: ["KP", "RU"]                         # Layer 1 (network context)
This rule combines three layers — Layer 2 (identity groups), Layer 1 (posture + network) — with an Allow decision when the include matches AND the require is satisfied AND the exclude doesn’t match.
Pattern 2 — Contractor → SaaS read-only
# SaaS application: salesforce.com
policy:
  - include:
      groups: ["Contractors"]                       # Layer 2
  - require:
      session_mfa_age: "< 4h"                       # Layer 2
      warp_enabled: true                            # Layer 1
  - action: allow_with_conditions
    conditions:
      - disable_download
      - disable_paste
      - browser_isolation: required                 # → Layer 4 RBI
Combines identity (contractor group) + session state (fresh MFA) + network (WARP on) → Allow with conditions, routed through RBI at Layer 4.
Pattern 3 — Admin path step-up
# Access application: admin.internal
policy:
  - include:
      groups: ["Platform-Admin"]                    # Layer 2
  - require:
      mfa_method: ["FIDO2"]                         # Layer 2
      session_mfa_age: "< 30m"                      # Layer 2
      device_posture: [domain_joined, mdm_compliant] # Layer 1
  - action: step_up_if_stale
The key insight: the strongest policies draw from every layer. Weak policies rely on one layer alone (e.g. only email domain) — no defence in depth.
Troubleshooting by layer
When an incident happens, the first question is “Which layer does this symptom belong to?” A cheat sheet:
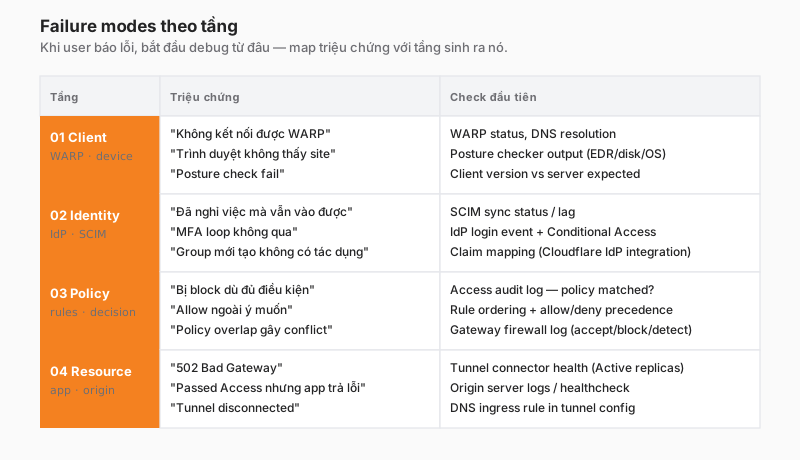
Four-step debug flow
- Reproduce — capture enough context (user, device, app, time).
- Classify — which layer does the symptom match most closely? (See the table.)
- Check the primary log for that layer:
- Layer 1: WARP client status page, posture checker output
- Layer 2: IdP audit log, SCIM sync status
- Layer 3: Cloudflare Access audit, Gateway log
- Layer 4: Tunnel connector health, origin log
- If the target log is clean, walk one layer down (e.g. Access log clean → check Identity → check Client).
The rule: debug from the resource (Layer 4) back toward the client (Layer 1), because that is the direction users experience failures in. Deployment goes the other way — build from the client up.
Trade-offs and design decisions
| Decision | Option A | Option B | Recommendation |
|---|---|---|---|
| Policy strictness | Default-block, whitelist exceptions | Default-allow, blacklist threats | Default-block for sensitive apps (admin, prod DB). Default-allow for the Internet (SWG default-allow + category block). |
| Device posture source | Built-in Cloudflare checks | Integration with EDR/MDM (CrowdStrike, Intune) | Built-in for teams under 100 users. EDR/MDM integration once security and EDR/MDM are mature. |
| Combining layers | Every rule combines all four layers | Combine only where it matters | Start loose (email + group), add a layer when a specific risk emerges. Do not over-engineer early. |
| Policy-as-code vs. dashboard | Everything through Terraform/API | Click through the dashboard | Dashboard is fine for pilots and under 20 rules. Move to IaC once there are 50+ rules or 2+ administrators. Part 4 covers this. |
| Ownership split | Security owns all policy | Split by layer: IT owns L1, IAM owns L2, security owns L3, app team owns L4 | Split by layer once the team is larger than ten. Cross-functional review every quarter. |
Checklist — when to use this model
Before configuring:
- Which layer does this feature belong to? (Not “what does it do”, but “what layer does it control”.)
- Are the signals at that layer available? (A posture rule without WARP rolled out does nothing.)
- Does the policy combine enough layers? Or does it rely on just one?
- Who owns this layer? Have they signed off on the configuration?
Before debugging:
- Which layer does the symptom point to?
- Where is the primary log for that layer?
- If the log is clean, which layer is the next suspect?
Before writing an RCA:
- Which layer holds the root cause? (Different from the symptom — the symptom may be at Layer 4 while the root cause is at Layer 2.)
- Which layer does the remediation touch? Will it cause drift elsewhere?
- Who owns the remediation?
Lessons from practice
- This model does not replace knowledge of individual products. You still need to know Access policy syntax, Gateway rule-evaluation order, and Tunnel ingress configuration. The model helps you organise that knowledge, not replace it.
- Group quality is the most common pain point. About 90% of “the policy works incorrectly” incidents eventually trace back to dirty groups at Layer 2 (stale members, nested groups not syncing, SCIM lag). Invest in identity hygiene before writing complex policy.
- Do not treat Layer 4 as a black box. Cloudflare stops at Layer 3 — once the decision is made, the request is forwarded to the origin. If the origin is slow, crashes, or has the wrong permissions, Cloudflare cannot fix it. An application owner must be in the loop.
- Debug runs in the opposite direction to deployment. Deploy from Layer 2 upward (identity → policy → WARP → Gateway). Debug from Layer 4 downward (user reports app failure → check origin → check tunnel → check policy → check identity → check WARP).
Summary
Cloudflare One has many products, many features, many checkboxes. Through the lens of four layers, it simplifies:
- Layer 1 (Client) — device signals.
- Layer 2 (Identity) — authentication + attributes.
- Layer 3 (Policy) — decisions based on Layers 1 and 2.
- Layer 4 (Resource) — the destination.
Facing the dashboard, ask which layer first. When a user reports a failure, ask which layer the symptom belongs to. When a team argues about ownership, ask who owns the layer.
If one line is worth remembering:
Deploy from the bottom up (identity hygiene → policy → WARP). Debug from the top down (resource → policy → identity → client). Do not reverse the direction.
Part 4 dives into Cloudflare Access — the first product that puts this model to work: create an Access application, wire up the IdP (Layer 2), write a policy with Layer-1 signals, test end-to-end.
References
- Cloudflare Access documentation
- Cloudflare Gateway policies
- Cloudflare device posture
- NIST SP 800-207 — Zero Trust Architecture (equivalent NIST model)
In this series: