TL;DR
Cloudflare Access is the ZTNA core of Cloudflare One: it sits in front of an internal application, authenticates the user through an IdP (Okta, Entra ID, Google), evaluates policy (group, posture, network), and decides whether to forward the request or deny it. Replacing VPN for private apps is the cleanest starting use case — fast ROI, low risk, and it establishes the framework for the rest of Cloudflare One.
This post covers:
- Why Access differs from VPN in blast radius.
- The four configuration objects (Application, Policies, IdP, Session).
- The end-to-end login flow with IdP and Tunnel.
- Five-step setup from scratch.
- Policy evaluation order (Include → Exclude → Require).
- Six common troubleshooting cases.
- Trade-offs when migrating from VPN.
The thesis:
VPN puts the user on a network. Access puts the user in front of an application. One word apart, an entire order of magnitude apart in blast radius — and that is the real reason ZTNA is worth the migration, not latency.
This is Part 4 of the Cloudflare One Handbook.
Who this is for
- Platform engineers planning to replace VPN for 1–10 internal apps.
- Security engineers writing a design doc for a ZTNA pilot.
- Ops/IT leads who need to see what Access configuration looks like in practice.
Recommended prior reading:
After this post you will:
- Understand where Access differs from VPN and when to pick Access.
- Know the four objects and how they relate.
- Be able to configure a first Access application end-to-end in about 30 minutes (pre-existing IdP + public DNS zone).
- Know how to write policies that use Include/Exclude/Require with correct semantics.
- Have a cheat sheet for the six most common failure modes.
What this post does not cover
- IdP-specific setup (Part 5 covers Okta/Entra/Google mapping).
- SCIM (Part 7).
- Tunnel architecture in depth (Part 8).
- Terraform / policy-as-code (a dedicated later post).
This is a happy-path tutorial + key concepts + common pitfalls. Target: after reading, a first app is running behind ZTNA.
Concepts
- ZTNA (Zero Trust Network Access) — the product category that replaces VPN for private-app access. See Part 2.
- Application — the Cloudflare Access object representing a resource (hostname). The scope of policy evaluation.
- Policy — the rule that decides who can reach an Application through Access. One Application can have multiple policies (evaluated in order, first match wins on Allow/Bypass).
- Identity provider (IdP) — the source that authenticates users. Cloudflare Access does not manage passwords — it trusts the IdP.
- Session — the state after a successful login. Represented as a JWT cookie
CF_Authorizationsigned by Cloudflare. - Origin — the actual server hosting the application. Cloudflare Access proxies to the origin once the policy passes.
- Tunnel — the recommended way to expose an origin to Cloudflare without a public IP (alternative: public IP with a firewall rule whitelisting Cloudflare’s IP range, which is more work).
Where Access differs from VPN — blast radius
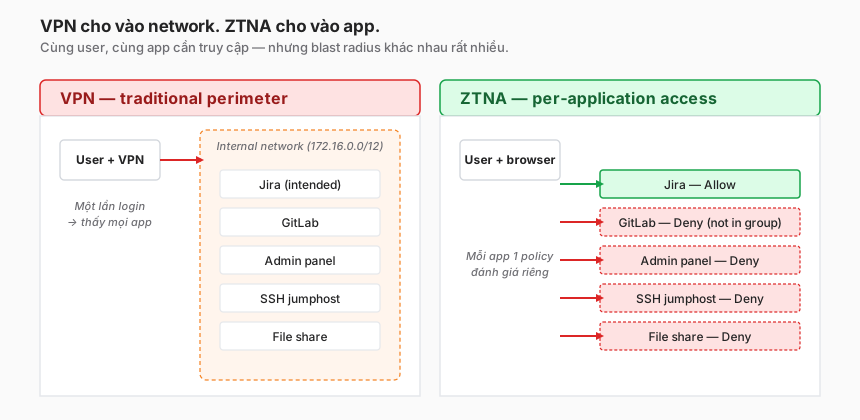
VPN and Access both “let the user into something”. The difference is what:
VPN
- The user authenticates → gets an IP inside an internal subnet.
- From that IP, the user can see every app in that subnet — ping, TCP connect, DNS lookup.
- Allow/deny decisions happen at the network layer (firewall rules, ACLs). The app does not know it is involved.
- If the user’s laptop is compromised after VPN login, the malware has full network access.
Access
- The user reaches
app.example.com→ Cloudflare sits in front, handling authentication + policy. - The user only sees the specific hostname that is authorised. Other apps are unreachable — from the user’s perspective they do not exist.
- Allow/deny decisions happen at the application layer, per app.
- If the laptop is compromised, the malware is limited to the apps the user was authorised for, not the entire network.
Things that are not Access’s real advantage
A few marketing narratives mislead:
- “ZTNA is faster than VPN” — not always. Browser-based Access adds a hop through the Cloudflare edge, which can be slower than a direct-to-datacentre VPN if the user is already near that datacentre. For geographically distributed users, Access is faster — because of the anycast network, not because ZTNA is inherently faster.
- “No client needed” — true for HTTP apps in a browser. Not true for SSH, RDP, thick clients — those still need WARP or a browser-rendered alternative.
- “Replaces VPN entirely” — it does not replace VPN for network-level use cases (site-to-site, lab networks). Access replaces VPN for user → application access. VPN/SD-WAN remains appropriate for branch connectivity.
Pick Access when the problem is user-to-app access. Keep VPN/SD-WAN when the problem is site-to-site networking.
Anatomy — four objects
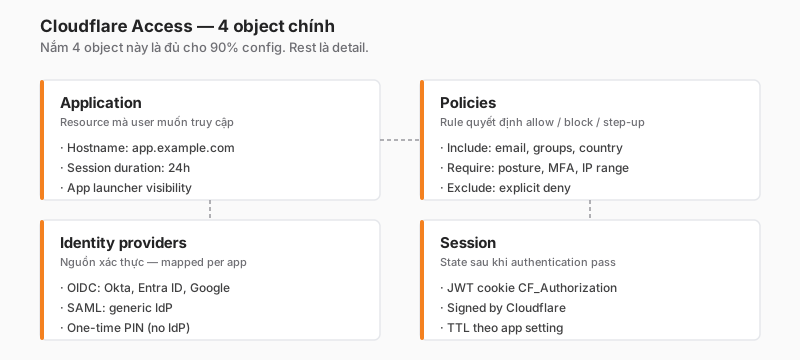
The Cloudflare Access UI has many menus, but 90% of configuration revolves around four objects:
Application
The parent object. Defines the resource to protect. Key fields:
- Application type: Self-hosted (your HTTP/HTTPS app) | SaaS (Okta, AWS Console with Cloudflare as the IdP front) | Private Network (non-HTTP through WARP) | Infrastructure (SSH, RDP, VNC, Kubernetes). This post focuses on Self-hosted.
- Application domain: the hostname the user types into the browser —
app.example.com. Must be in a zone you control on Cloudflare DNS. - Session duration: how long before re-auth is required. Default is 24 hours. Sensitive apps should set it short (15m–1h).
- App launcher: whether it appears in the Cloudflare Access portal (
<team>.cloudflareaccess.com). - CORS / custom headers / identity in headers: advanced — forwards user info to the origin via headers.
Policies
Child of Application. The actual evaluation rules. An application can have multiple policies — evaluated in order, first match wins.
Each policy has three parts:
- Include: who is in scope for this rule?
- Exclude: who is excluded regardless of include?
- Require: additional conditions that ALL must hold.
Details on evaluation order below.
Identity providers (IdPs)
Independent of Application — configured at the account level, then mapped into each Application.
- Supported: Okta, Entra ID (Azure AD), Google Workspace, generic SAML, generic OIDC, GitHub, AD, Facebook, LinkedIn, one-time PIN (no IdP required).
- A single Cloudflare account can have multiple IdPs simultaneously — e.g. Okta for employees + GitHub for contractors.
- Each Application chooses which IdPs apply (default: all).
Session
Once authentication passes, Cloudflare sets the CF_Authorization cookie on the app’s subdomain — a JWT signed by Cloudflare. The browser sends this cookie on subsequent requests; Access verifies the signature and expiration and forwards to the origin when valid.
The origin can read the JWT to learn the user identity (Cloudflare also forwards Cf-Access-Authenticated-User-Email and the JWT in Cf-Access-Jwt-Assertion headers). This is useful for customising the UI (“Hi Alice”) or app-level RBAC.
Login flow — end to end
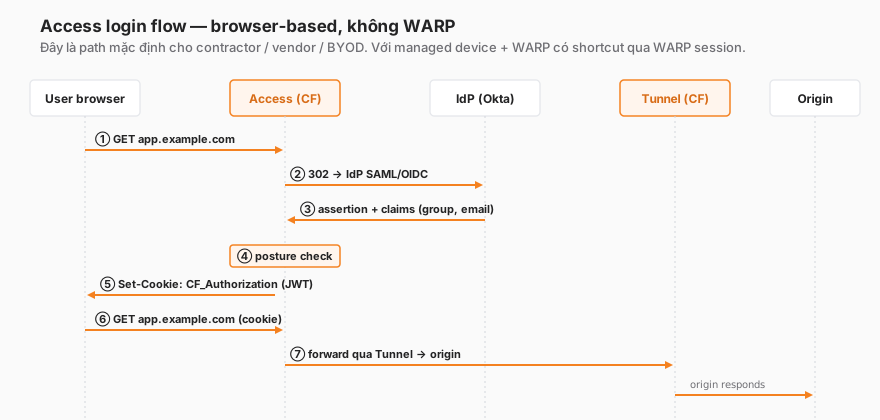
When a user reaches app.example.com for the first time (no cookie), the full flow looks like:
Step by step
① GET app.example.com
The browser issues the request. Cloudflare DNS resolves the hostname to the Cloudflare edge (because the DNS record is proxied — orange cloud).
② Cloudflare returns 302 → IdP
The edge sees no CF_Authorization cookie → Access kicks in. A redirect is returned to the IdP login URL (SAML/OIDC authorization endpoint).
③ IdP authenticates and returns an assertion The user logs into Okta/Entra. The IdP redirects the browser to the Cloudflare callback URL with a SAML assertion or OIDC code. Cloudflare exchanges the code → receives claims (email, groups, etc.).
④ Posture check (if policy requires)
If the policy has require: device_posture, Cloudflare queries the WARP client for current posture state. No WARP installed or unenrolled → posture unknown → policy fails.
⑤ Set-Cookie CF_Authorization
If Include + !Exclude + Require all pass → Cloudflare issues the JWT, sets a cookie scoped to .example.com, and redirects the browser back to the original app URL.
⑥ Browser retries with the cookie Second GET carries the cookie. Cloudflare verifies the JWT signature and expiration.
⑦ Forward through the Tunnel to the origin
The Cloudflare edge reverse-proxies to the cloudflared connector running in the origin network. The origin returns its response, Cloudflare streams it back to the browser.
Subsequent requests
During session_duration, the cookie is valid → every request goes straight to step ⑦. Once the session expires, control returns to step ②.
With WARP + managed device
Shortcut: if the user has enrolled WARP, the Cloudflare edge takes identity directly from the WARP session → skipping the IdP redirect (steps ② and ③). Perceived latency is better, and posture signals are available in real time.
Five-step end-to-end setup
Target: you have gitlab.internal.example.com running in an AWS VPC (no public IP), and want Access in front of it. Pre-requisites:
- The
example.comzone is added to Cloudflare with DNS proxy (orange cloud). - The origin
gitlab.internal.example.comresolves from inside the VPC (e.g. via Route 53 private zone). - An IdP exists (this example uses Okta; configure the OIDC app on the Okta side first).
Step 1 — Wire up the IdP (once per account)
Cloudflare dashboard → Zero Trust → Settings → Authentication → Add new → select Okta → enter:
- Client ID (from the Okta app)
- Client Secret
- Okta domain (e.g.
yourcompany.okta.com)
Save. Cloudflare verifies the connection. From now on, new Access applications can pick Okta as an available IdP.
Step 2 — Install the cloudflared connector at the origin
Cloudflare dashboard → Zero Trust → Networks → Tunnels → Create a tunnel.
Pick Cloudflared, name it (e.g. prod-internal), Next. Cloudflare generates the install command:
# Example: Debian/Ubuntu host inside the VPC
curl -L https://pkg.cloudflare.com/install.sh | sudo bash
sudo apt-get install cloudflared
sudo cloudflared service install eyJhIjoi...long-token...
sudo systemctl status cloudflared
Connector starts → dashboard shows “Healthy”. This is outbound-only — no inbound port has to be opened on the VPC.
Step 3 — Add a public hostname to the Tunnel
Same Tunnel → Public Hostname tab → Add a public hostname:
- Subdomain:
gitlab - Domain:
example.com(Cloudflare automatically creates the DNS recordCNAME gitlab.example.com → <tunnel>.cfargotunnel.com, proxied) - Service:
http://gitlab.internal:80(the origin URL the connector can reach from inside the VPC)
Save. Test without Access — open the browser at https://gitlab.example.com — GitLab should appear. But without Access yet → not secured.
Step 4 — Create the Access Application + Policy
Zero Trust → Access → Applications → Add an application → Self-hosted.
- Application name:
GitLab Internal - Session duration: 1 hour
- Application domain:
gitlab.example.com(the hostname the Tunnel serves) - Identity providers: Okta (ticked)
Next → Policies:
Policy 1 — Allow engineers
- Name:
Engineering only - Action:
Allow - Session duration: inherit
- Include:
emails_ending_in: @example.comgroups: [Engineering, Platform](groups from the Okta claim)
- Require:
device_posture: [disk_encrypted](optional if WARP is deployed)
Save.
Step 5 — Test the flow
Open an incognito browser → https://gitlab.example.com.
- Expect the Cloudflare Access login page → pick Okta → redirect to Okta login.
- After login, the browser is redirected back to Cloudflare → policy is verified.
- If the user is in the Engineering group → landing on the GitLab login page.
- If the user is outside the group → “Access denied” page from Cloudflare.
Check logs:
- Zero Trust → Logs → Access — every login event (allowed/denied with reason).
- Networks → Tunnels → Metrics — connector health.
- Analytics → Gateway — if a Gateway policy is also in play.
Policy evaluation order — the part that bites people
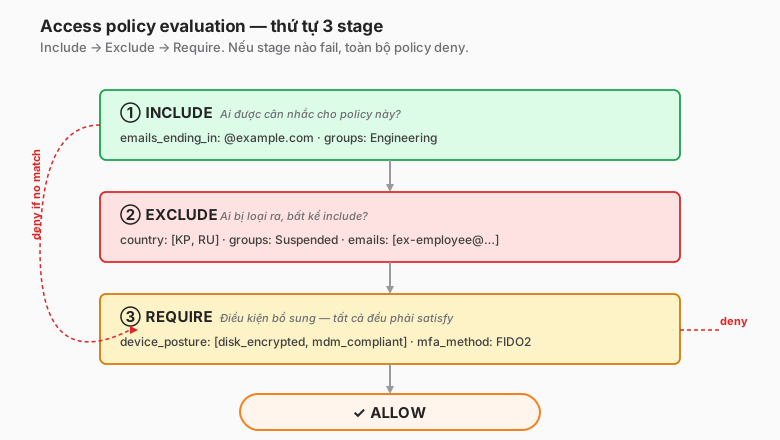
This is where many teams get bugs. Understanding the evaluation flow correctly avoids 80% of misconfigured policies.
Three stages inside a policy
Include (logical OR) — at least one rule matches for the user to be in scope.
include:
  - emails_ending_in: @example.com
  - groups: [Contractors]
→ Passes if the user’s email ends in @example.com OR the user is in the Contractors group.
Exclude (immediate deny on match)
exclude:
  - emails: [ex-employee@example.com, revoked@example.com]
  - country: [KP, RU]
→ If the user email or country matches → deny this policy (no further policies considered).
Require (logical AND) — ALL conditions must hold.
require:
  - device_posture: [disk_encrypted]
  - mfa_method: [FIDO2]
→ The user must have both disk_encrypted AND FIDO2 MFA. Missing either → fail.
Between policies on the same Application
An application can have several policies; order matters. Cloudflare evaluates them top to bottom:
- Policy 1 (order 1):
AllowEngineering - Policy 2 (order 2):
Bypass(no auth) from office IP - Policy 3 (order 3):
Blockeveryone
Cloudflare checks each policy. First match wins (on Allow/Bypass) or last block wins. In practice:
- If the first Allow policy matches → user allowed, no further policies considered.
- If no Allow/Bypass matches, the Block policy → denied.
- If no policy matches, default deny.
Recommended policy-writing order
- Bypass rules (if any — public endpoints, healthcheck paths) — at the top.
- Allow rules specific-to-broad (admin first, then users).
- Block rules explicit (deny by country, IP range, banned group).
- Default deny — no need to write; it is the fallback.
Common mistakes
- Broad Allow before narrow Block — Allow
@example.comat order 1, BlockSuspended-usersat order 2. A Suspended user with an@example.comemail still gets allowed by the first match → never hits Block. - Missing
require: device_posturefor sensitive apps — an admin panel policy that checks only email domain, with no managed-device requirement → a contractor laptop compromise still gets in. - Session duration too long — 30 days for an admin panel means a stolen laptop stays authorised for 30 days. Admin panels should sit at 30 minutes to 1 hour.
Troubleshooting — six common cases
1. “User is stuck in a redirect loop between Cloudflare and Okta”
Usually: an incorrect OIDC callback URL, or clock skew between Okta and Cloudflare (invalid JWT timestamp).
Check:
- Okta OIDC app → Login redirect URIs → must match the Cloudflare callback URL exactly.
- Browser DevTools → Network → watch the 302, copy the callback URL, compare.
2. “User logs in successfully but is still denied”
The group claim is not matching.
Check:
- Zero Trust → Logs → Access → click the deny event → “Identity” tab.
- Verify the group name Okta returns exactly matches the policy value. Okta may return
Engineering-VNwhile the policy expectsEngineering.
Fix: either change the policy or align the group naming convention in Okta (Part 5 goes into this).
3. “502 Bad Gateway after Access passes”
Policy passed, but the origin did not respond. Tunnel or origin issue.
Check:
- Networks → Tunnels → [tunnel name] → Metrics → connector status Healthy?
- If Healthy — on the origin host,
curl http://gitlab.internal:80— is the origin up? - Check
cloudflaredlogs:journalctl -u cloudflared -n 100.
4. “Posture check always fails”
WARP is not enrolled, or the posture checker is not reporting.
Check:
- Is the user running WARP enrolled to the right organisation? (status-bar WARP icon)
- Does the posture type match reality? (e.g.
disk_encryptedon Windows checks BitLocker; a Mac user with FileVault needs a separate rule.) - Zero Trust → Settings → WARP Client → Device enrollment permissions — is the device listed?
5. “A user logged in once and seems to stay logged in forever — how long?”
The CF_Authorization cookie TTL equals the Application’s session_duration. Default 24 hours. For sensitive apps, set 1 hour or shorter.
Manual logout: https://<team>.cloudflareaccess.com/cdn-cgi/access/logout.
6. “Access is blocking every user after a policy update”
Check policy order — did a Block rule end up above an Allow rule? The dashboard toggles can accidentally disable an Allow policy.
Quick fix: disable the just-updated policy, traffic reverts to the previous state. Then debug carefully.
Trade-offs
| Decision | Option A | Option B | Recommendation |
|---|---|---|---|
| Session duration | Short (1h) | Long (30 days) | Short for admin/prod apps, long for productivity apps. Default 24h is fine for most. |
| Bypass for trusted IPs | Yes | No | Only for healthcheck / monitor endpoints. Never for office IPs — IPs can be spoofed. |
| Device posture required | Every app | Sensitive apps only | Depends on the rollout stage. Posture everywhere = high friction before WARP is deployed. Start with sensitive-only. |
| IdP count | Single IdP for all | Multiple IdPs per app | One primary IdP + one-time PIN fallback for vendors. Multiple IdPs complicate audit. |
| App launcher visibility | Show every app | Hidden by default | Show — users know what they are entitled to, fewer “where is this app?” tickets. |
| Tunnel replicas | 1 | 2+ | Always 2+ in production, across nodes/AZs. One replica failing = outage. |
Checklist — before Access goes to production
- IdP group naming convention is standardised.
- Policy has been tested with at least three different users (employee, contractor, boundary case).
- Tunnel has ≥2 connector replicas across different hosts/AZs.
- Session duration matches the app’s sensitivity.
- Audit logs are configured to forward to the SIEM (if any).
- The Access denied page includes a support link (support email / runbook).
- Logout URL documented for users.
- Rollback plan: if Access fails, how is the app re-exposed via VPN temporarily?
- Bypass rules for healthcheck/monitoring tools are in place and tested.
- SCIM off-boarding policy (Part 7) — or at minimum a manual group cleanup process.
Lessons from practice
- Always keep one Access application called
sandboxfor testing policies before production. Never edit a production policy directly — a typo in a group name can lock out every engineer. - “One policy for everything” does not scale. Once apps exceed 20 and policies exceed 100, visual review is impossible. Move to policy-as-code (Terraform) early, not after 100 rules.
- Re-test every quarter with the current staff list. IdP group drift and user lifecycle drift mean a policy that was correct six months ago may no longer be.
- Do not use Access as a firewall. Access filters by identity and policy. For traffic-pattern filtering (rate limiting, bot detection, malware payload), use WAF or Gateway.
Summary
Cloudflare Access is a foundational component of Cloudflare One. Creating the first app does take 30 minutes, but reaching policy maturity (policy-as-code, SCIM, posture integrated, audit pipeline) takes 3–6 months. Don’t conflate the two numbers.
If one line is worth remembering:
Access does not replace VPN because it is faster. Access replaces VPN because the blast radius is smaller — one policy, one decision, one log per app. VPN does not give you that, even with SSO in front.
Part 5 dives into IdP integration — Okta, Entra ID, Google Workspace, generic SAML — with four setup matrices and the pitfalls specific to each.
References
In this series: